
Kubernetes clusters have become the go-to solution for hosting applications in the cloud. Most cloud providers offer Kubernetes services, such as the Azure Kubernetes Service (AKS), Amazon Elastic Kubernetes Service (Amazon EKS), or Google Kubernetes Engine (GKE). But are you spending too much on compute resources in the cloud? Is your load pattern complex and difficult to predict? Is the load growing inconsistently or are you running applications on-demand that could cause sudden bursts?
The beauty of the cloud is that it provides an (almost) infinite supply of compute resources that can be tempting to use. To build a resilient system, you might have chosen the most obvious path - reserving as many compute resources as needed for the worst case scenario. But these compute resources aren’t free and can quickly stack up costs. This blog post will walk through how you can reduce these costs by minimizing the compute resources and maximizing the utilization of the given compute resources.
At Rubrik, we reduced our cloud costs by around 40%! Here’s an overview of how we did it:
Choose an Autoscaler
We started simple and looked at what the cloud has to offer off-the-shelf. We needed a scaling system that dynamically adjusts the compute resources to our needs--an autoscaler. Fortunately, engineers had already developed the open source cluster autoscaler that automatically adjusts the node count of a Kubernetes cluster as needed. It supports many different cloud providers (e.g. GKE, EKS, AKS) and can be deployed on any Kubernetes cluster as an additional pod. Azure has already integrated the autoscaler in their Azure Kubernetes Service (AKS). As a potential alternative to the off-the-shelf solution, we also considered writing our own autoscaler. But the final design was very similar to the off-the-shelf autoscaler logic and maintaining our own system in the fast evolving cloud environment seemed to add a lot of unnecessary overhead.
We then went ahead and built and deployed the Kubernetes autoscaler to our cluster following the instructions provided by the cluster autoscaler package. Using Azure as our cloud provider, we could even enable the autoscaler simply from the Azure Portal UI (AKS Autoscaler):
Note: Depending on your cloud provider, your Kubernetes cluster might have to meet some configuration requirements to deploy the autoscaler. For Azure, the nodepool must be a VMSS (Virtual Machine Scale Sets).
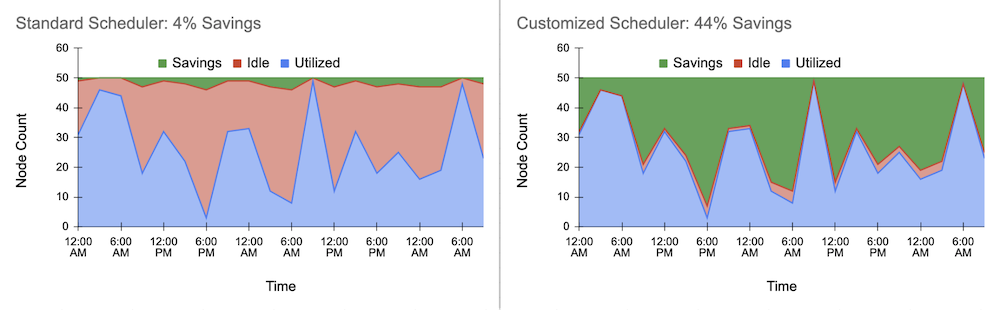
After successfully deploying the autoscaler, we evaluated the initial cost savings. Below is the exemplary load pattern utilizing up to 50 nodes. The blue area is the amount of required (utilized) resources, and the red area represents the idle resources that should be minimized. The green area displays the savings from enabling the autoscaler:

We obtained about 4% cost savings. A good start! But didn’t we state a reduction of 40%? What prevented the autoscaler from actually reducing the idle resources further? Let’s take a closer look at the scaling logic of the cluster autoscaler.
Customize the Autoscaler
The autoscaler will monitor the pod queue of the Kubernetes cluster at a constant frequency and switches between scaling up and scaling down mode. These are the main scaling criterias:
Scale up if there are pods waiting in the pod queue. Scale up by enough nodes to ensure all pending pods can run in parallel. The node estimator of the autoscaler uses a bin packing approach to determine the required number of nodes.
Scale down if a node is completely unused or only runs pods that are safe to evict for a specified period of time.
Several parameters allowed us to customize the scaling logic of the Kubernetes autoscaler further. The optimal parameter settings for the autoscaler logic depend, of course, on the load pattern of the cluster.
We set the minimum node count min-nodes to 1 to maximize cost savings during zero load times. The maximum node count max-nodes should be the maximum number of nodes needed in the worst-case scenario. For our load case, we chose 50 nodes. We also found it beneficial to increase the parameter scale-down-unneeded-time to 30 minutes. Our load pattern included large bursts at a 20-minute frequency, and scaling up and down in between these bursts was adding unnecessary noise to the AKS without actually saving us much cost. Setting the parameter scale-down-delay-after-add to 1 minute allowed the autoscaler to almost immediately consider scaling a node down again when added to only handle a short burst load. Finally, changing the scaling frequency scan-interval from 10 to 30 seconds reduced the rate of API calls from the autoscaler pod to the AKS API to avoid throttling issues.
Customizing these parameters of the scaling logic already significantly improved the autoscaler performance. But there was one more challenge for us to overcome before we could achieve the 40% of cost savings. By only customizing the autoscaler, we ended up with a very low node utilization. The application pods were distributed over all available nodes, preventing the nodes from being scaled down by the autoscaler. Using a customized scheduler solved this issue.
Customize the Scheduler
To reduce the compute resources and thereby the cloud cost, we mainly relied on the scale down logic to remove nodes from the cluster as fast as possible. The scale down criteria was stated as:
Scale down if a node is running only pods that are safe to evict for a certain period of time.
Pods can be safe to evict because of their priority (see Pod Priorities and Preemption) or because they are backed up by a controller (e.g. a replica set) or if they have a non-restrictive PodDisruptionBudget and don’t fall into any other pod categories that would prevent the autoscaler from scaling down the underlying node. The autoscaler can then consider deleting such “safe-to-evict” pods and redeploying them on a different node to optimize the bin packing problem and to remove nodes with low utilization from the cluster. So, if your application only uses pods that are safe to evict, there is no need for customized scheduling.
But what happens if an application uses stateful pods that are not safe to evict? These pods cannot be moved to a different node and as soon as one of these pods runs on a node, the node is assumed to be “needed.” The node is blocked for scaling down, and the countdown for the scale-down-unneeded-time is set back to the initial 30 minutes. Unfortunately, the default Kubernetes scheduler optimizes for load balancing and thereby distributes the pods across nodes as evenly as possible. In the worst case, this could lead to each node running only one pod at a time, blocking the autoscaler completely from scaling down.
So for our application, instead of evenly distributing the pods across nodes, we needed to pack the nodes as much as possible by scheduling pods on nodes that are already used the most. Thereby we minimized the number of utilized nodes and let the autoscaler remove the unneeded nodes. To pack the nodes as much as possible we decided to use a customized Kubernetes scheduler. A customized scheduler can change the logic of assigning pods to nodes (Scheduling Policies) by setting specific flags during its deployment. If the weight of the scheduling priority flag MostRequestedPriority is set to 100 using a ConfigMap, pods get scheduled on the node that is already used the most. The customized scheduler can be deployed to a Kubernetes cluster as an additional pod alongside the default scheduler. The pods of an application then specify which scheduler to use. Here are the most important settings we used for the policy configmap, the scheduler deployment, and the application pod:
ConfigMap:

Deployment:

Pod:

So after deploying the customized scheduler to our Kubernetes cluster, we looked again at the cost savings. For our application, the customization of the autoscaler and the scheduler was the big win - we observed cost savings above 40%!
Handle Long-Running Pods
Finally, it remains to say that there is still room for improvement. Some Kubernetes pods are long-running and unevictable (e.g. metrics server or system pods). If these pods are spread across different nodes, the nodes are blocked from scaling down and might add unnecessary costs. We avoided this by assigning these pods to a specific node during scheduling using the node affinity feature. After labeling a node (e.g. runLongRunningPods:True), we added a node affinity to the spec of the long-running pod such that it prefers to be scheduled on nodes with that label. The pod spec looked similar to this:
Pod:

We used this approach for the long-running metric pods and the customized scheduler pod deployed by Rubrik. For system pods deployed by Azure we, unfortunately, could not change the spec. A potential solution specifically for the Azure AKS would be to use multiple node pools, a system-node-pool with only one node on which all the system pods are running, and a user-node-pool that scales on demand and on which all the application pods are running.
With these ideas in mind, let’s see what cost reduction you can achieve for your own cluster - good luck!
Resources