One of Rubrik’s principle tenants is integrated automation made possible by its rich suite of RESTful APIs. Rubrik follows an API-first architecture to enable infrastructure automation with third party services, including simplification of data management tasks and integration with configuration management tools. One example of custom workflows with Rubrik’s APIs is with VMware vRealize Automation. In this post, I will demonstrate another example of automated orchestration with Rubrik with Redhat Cloudforms and Ansible.
Introducing Redhat CloudForms and Ansible Tower
As of Redhat Cloudforms version 4.1, Ansible Tower is natively integrated. With this integration, Red Hat CloudForms leverages the automation capabilities of Ansible, enabling Ansible Job Templates to be launched from CloudForms Service Catalog as a Service Item.
Ansible Tower is a configuration management tool designed to help automate infrastructure operations. Ansible Tower features management of host inventory, Ansible playbooks, access keys and passwords, as well as detailed reporting and auditing of infrastructure deployments.
CloudForms is a hybrid cloud management platform based on the ManageIQ community. CloudForms provides a myriad of functions that include:
- Monitoring and tracking
- Capacity management and planning
- Resource usage and optimization
- Workload life-cycle management
- Policies to govern access and usage
- Self-service portal and catalog
- Controls to manage requests
- Quota enforcement and usage
- Chargeback and cost allocation
- Automated provisioning
Redhat Cloudforms integration with Ansible Tower provides deeper automation capabilities to help simplify daily management and orchestration tasks. The scenario I walk through in this blog post is how to create from an Ansible job template a service catalog item in Cloudforms that allows you to assign a Rubrik SLA domain to an existing virtual machine.
A How-To Guide to Integrating Rubrik with Redhat Cloudforms Through Ansible
Step 1.
The first thing we have to do is create a Python library to interact with the Rubrik REST API. This file has to be included in your Ansible library folder.
Step 2.
Create an Ansible playbook (yaml file) that consumes the module and allows us to assign a Rubrik SLA domain to a virtual machine.
Code Block 1 rubrikAssignSlaDomain.yaml
– name: Playbook to assign a Rubrik Sla Domain to a VM
vars:
# rubrikUrl: “url”
# username: “username”
# password: “password”
# vmName: “vmName”
# slaDomainName: “slaDomainName”
hosts: localhost
tasks:
– name: “assign Rubrik Sla Domain {{ slaDomainName }} to VM {{ vmName }}”
rubrik_assign_sla_domain:
state: “present”
rubrikUrl: “{{ rubrikUrl }}”
username: “{{ username }}”
password: “{{ password }}”
vmName: “{{ vmName }}”
slaDomainName: “{{ slaDomainName }}”
Step 3.
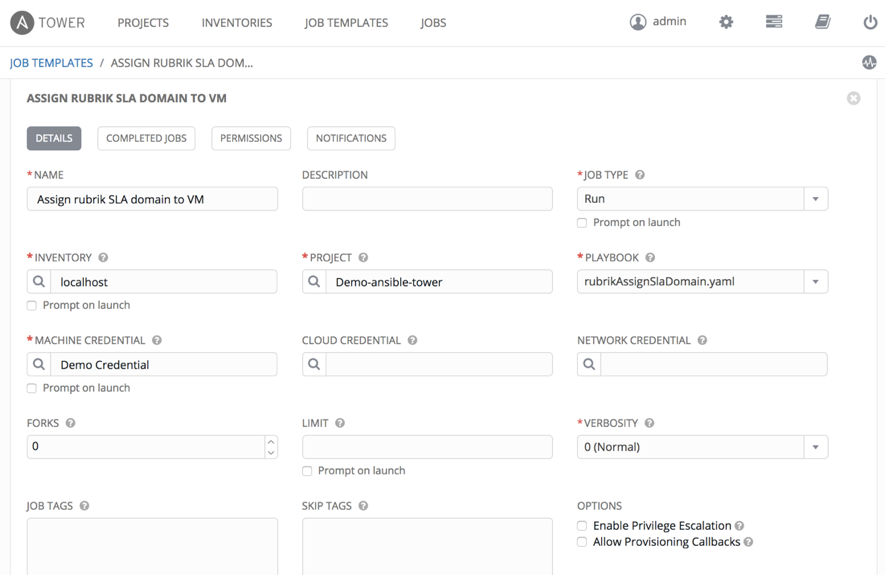
Within Ansible Tower create a new job template as shown on the following screen, where you select the playbook we just created.
Step 4.
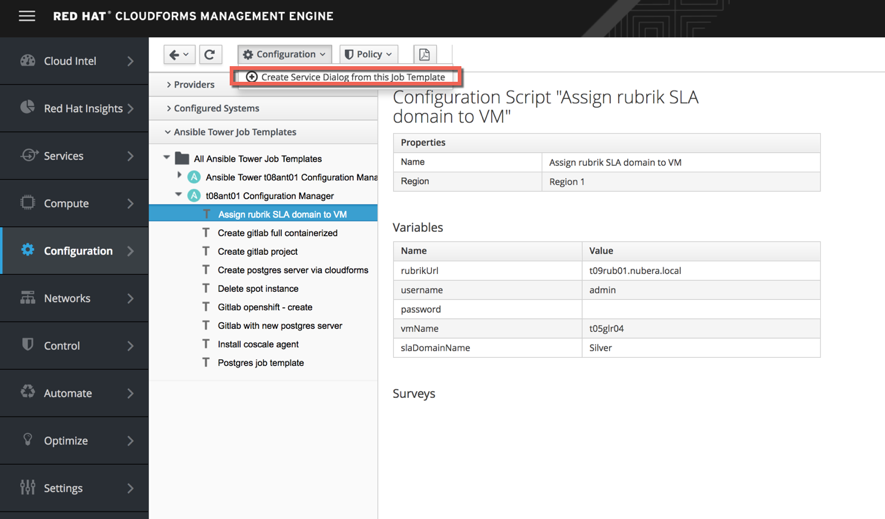
Log onto Cloudforms, go to the configuration management tab, select your Ansible Tower provider, right click the job template we just created and select:
Step 5.
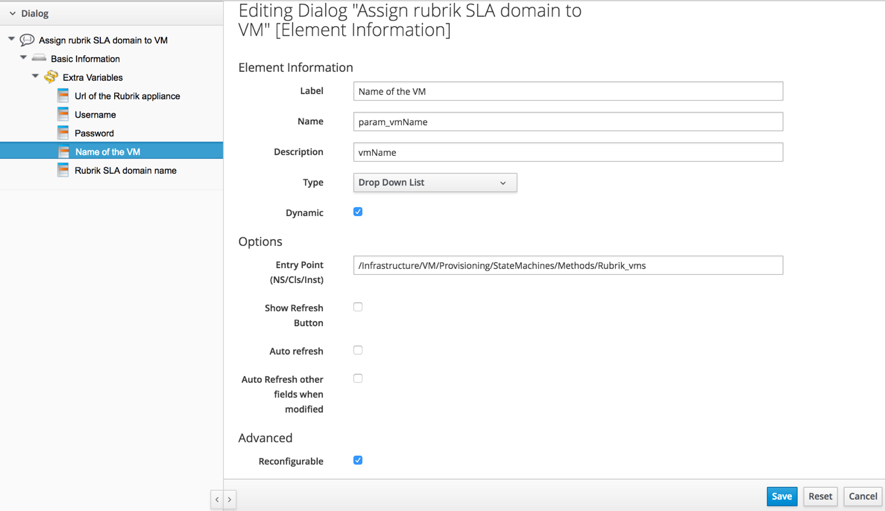
Next, browse to the Automate / Customization tab, find the newly created dialog and if necessary modify where required.
Some additional notes:
In this particular case, we are required to make the dropdown box dynamic. As such it interacts with the Rubrik API and returns all the virtual machines known by Rubrik. To do this within Cloudforms you are required to create a new “Automate Instance” and a new “Automate Method”. The following ruby code is what we used in this particular example and can be used to get you started.
Code Block 2 Rubrik_vms
require ‘rest_client’
require “base64”
dialog_field = $evm.object
url = ‘https://t09rub01.nubera.local/api/v1/login’
rest_return = RestClient::Request.execute(
:method => :post,
:url => url,
:verify_ssl => false,
:headers => {
# :Authorization => “Bearer #{token}”,
:content_type => :json,
:accept => :json
},
:payload => ‘{“username”:”admin”,”password”:”<mysecretpassword>”}’
)
result = JSON.parse(rest_return)
token = Base64.encode64(result[‘token’])
url = ‘https://t09rub01.nubera.local/api/v1/vmware/vm?limit=999999’
rest_return = RestClient::Request.execute(
:method => :get,
:url => url,
:verify_ssl => false,
:headers => {
:Authorization => “Basic #{token}”,
:content_type => :json,
:accept => :json
}
)
result = JSON.parse(rest_return)
values = []
result[‘data’].each do |child|
values.push([child[‘name’],child[‘name’]])
end
dialog_field[“values”] = values
Step 6.
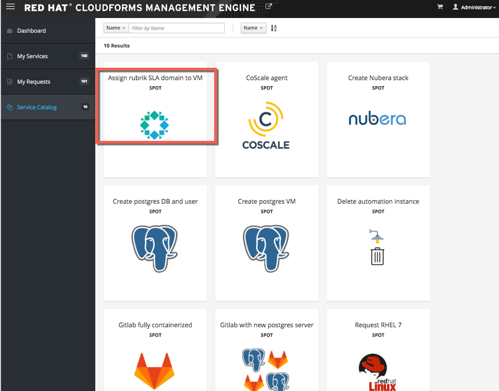
Now we are ready to create a new Service Catalog Item. To do so, browse to the Services / Catalog tab, click Configuration / Add a new Catalog Item. Choose Ansible Tower as the Catalog Item Type and fill in the form accordingly. When done, click the save button.
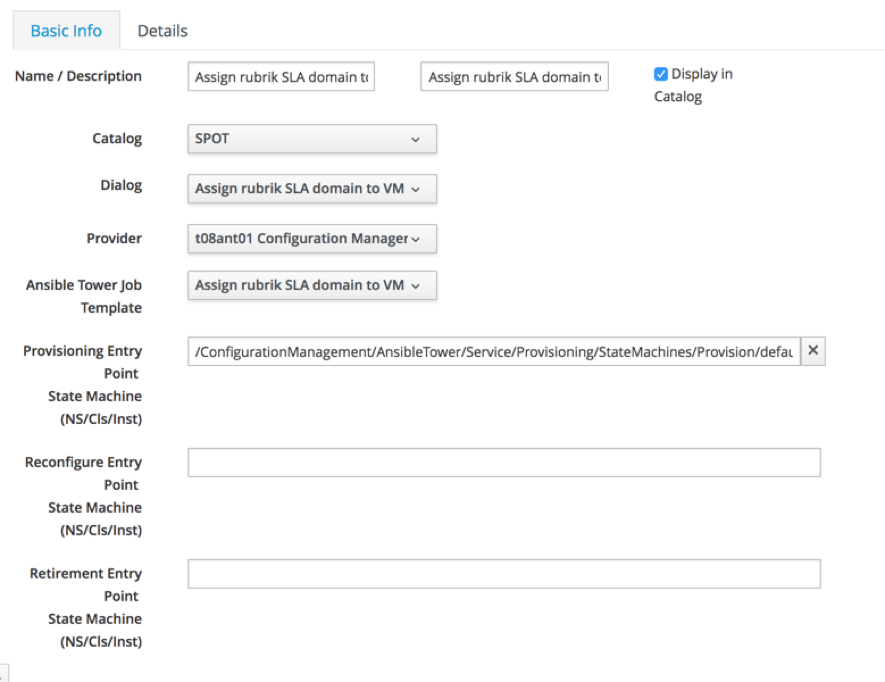
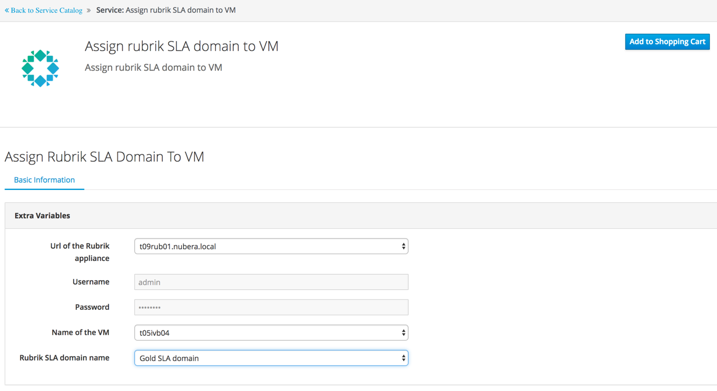
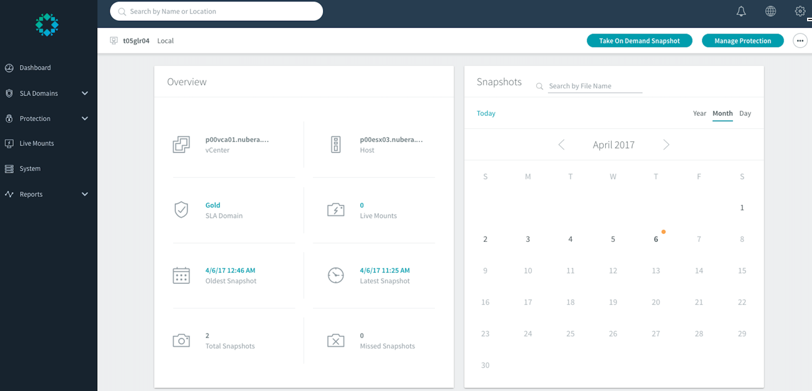
At this time, you can request the Service Catalog Item, select the virtual machine and the required Rubrik SLA domain.
- Catalog Item
Bringing Automation to the Modern Data Center
The above described scenario only one way you can integrate Rubrik with configuration management tools to free up your management time and simplify task management. These automation worflows enable IT to be easily consumed as a service. Now, it’s time to started on your own cases! For more information on Rubrik’s APIs, check out an on-demand version of our webinar: Automatically Ensure your Applications, Services, and Servers can be Restored. Learn more about Automated IT with Nubera here.
